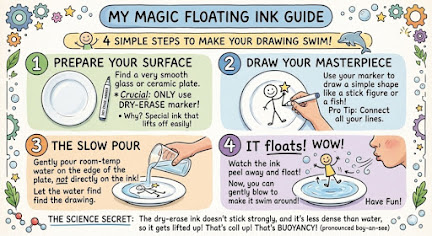
🧪 Experiment: The Floating Ink
The Goal: To make a drawing come to life and swim around a plate.
📝 What You’ll Need
• A glass or ceramic plate (Make sure it has a smooth, shiny surface).
• Dry-erase markers (Brand new or "juicy" ones work best).
• A glass of room-temperature water.
• A steady hand.
🛠 Instructions
1. Draw Your Character: Use the dry-erase marker to draw a simple shape on the plate. A stick figure, a heart, or a spider works great. Tip: Make sure all your lines are connected!
2. Let it Dry: Wait about 30–60 seconds for the ink to fully dry on the plate.
3. The Slow Pour: Slowly pour water onto the edge of the plate. Don’t pour it directly onto the drawing; let the water creep up to it from the side.
4. Watch the Magic: As the water touches the drawing, the ink will begin to peel off the plate and float to the surface.
5. Make it Move: You can gently blow on the water or use your finger to "walk" your drawing around!
🧐 How Does It Work?
Most markers (like permanent ones) use an adhesive to make the ink stick to the surface. However, dry-erase markers use a special oily silicone polymer. This prevents the ink from sticking too strongly.
• Insolubility: The ink doesn't dissolve in the water (it’s insoluble).
• Density: The ink is less dense than the water. Once the water gets underneath the drawing, the buoyancy force pushes the ink up, causing it to float.
💡 Extra Challenges
• The Stick-on Tattoo: Try gently placing a piece of paper on top of the floating drawing. Can you lift the drawing off the water?
• Temperature Test: Does the drawing float faster if you use warm water instead of cold water?
• Color Race: Do different colors float better than others? (Black usually works best!)

Comments
Post a Comment